By Screen Printer on
Oct. 17, 2012
Forums:
I have a Tri-loc and the Carrier Sheets have been a pain.
I went to Alan's a while back and saw his system. Really neat!
I also got a Little info from Brian! Thanks guys!
I changed my whole system around.
I removed my Tri-loc from my exposure unit and mounted it to my light table.
Now I can register my art on my light table with double sided tape.
The art sticks to my screen and I burn it.
Just did a 6 color job and I just had to adjust one color slightly.
This is the ticket!
NO MORE CARRIER SHEETS!!!!!!!
Just wanted to share.
Location:
United States
Attachment:
Re: Tri-Loc Registration !!!!!!!!!!!!!
Glad to hear it all worked out for you.
Owner/Operator of Middletownink
Re: Tri-Loc Registration !!!!!!!!!!!!!
hmmmmmmmmmmmmmmmmmmmmmmmmmmmmmm
Re: Tri-Loc Registration !!!!!!!!!!!!!
are you putting the tape on the screen first, or on the art?, what holds the art in place on the alignment grid awaiting the screen? when I go to put a screen in the tri loc exposure jig I sometimes see my film shift from the screen touching it, so I usually put a little peice of tape to hold the film in place on the glass before popping in a screen, how are you getting passed that? this is interesting, would like to hear, and or see more pics.
Thanks
Mike
Re: Tri-Loc Registration !!!!!!!!!!!!!
I put a 3" piece of clear tape in 3 areas on the art...
2 on top (left and right) and 1 on bottom center.
Then I put a piece of double sided tape on top of the clear tape.
This way when you remove the double sided tape..it does not leave residue on your art. The clear tape stays on the art. Double sided tape will leave residue on film but not on the clear tape.
The double sided tape is sticking off the film about 1/8"...which will hold it down to the light table.
Nice!
I also found that the film was easy to shift on the exposure unit...especially if you used the carrier sheet again.
Aligning is so much better my new way.
Thanks to Alan and Brian!
Re: Tri-Loc Registration !!!!!!!!!!!!!
Here is what I did to our Tri-loc. I think it worked great as it's supposed to work, but we gang images up to save on our screen usage because if we didn't, we'd be burning through 40-50 screens a day instead of 20-25. I tried to mimic the MHM FPU as much as I could while maintaining the tri-loc's stop blocks so you can see in the pics how we achieved that. I flipped the FPU jig, raised it the right height so that the blocks would touch the screen frames in the same location when it's on the press jig and used my simple geometry skills to place the film grid in the right location and we then don't have to use double sided tape. The film positioning is much quicker now than the way we had it before but I think both ways are as accurate with one another so it could be personal preference as to which way you want to do it.
I'd love to have the time to redo this setup and make it look better but as far as functionality, it's perfect. But I'm a perfectionist so over time this will be modified and perhaps one day it will morph into something that looks as great as it performs.
Re: Tri-Loc Registration !!!!!!!!!!!!!
Check it out here.
Re: Tri-Loc Registration !!!!!!!!!!!!!
...I am doing something similar. Using it as a wall-mounted FPU for the moment. Currently wont work with the TriLoc palllet on-press due to stop-block orientation, but I will be working on a solution to that when business slows a bit
Re: Tri-Loc Registration !!!!!!!!!!!!!
So are you just lining up your registration marks to the grid on your light table?
Do you have registration marks already set dead on that matches your grid that you just place your seps into each time that you output?
Thanks,
Paul
luxinks.com
http://facebook.com/luxinks
twitter.com/luxinks
924 Calle Negocio
Suite D
San Clemente Calif. 92673
(949) 200.2923
screen printing,t-shirt printing,custom shirt printing,contact screen printing,custom apparel printing,private label,water base,discharge,flock,puff,foil,burnout,garment finishing,fast turnaround,cheap t-shirt printing,great pricing,sublimation printing
Our customer service is outstanding and our quality is superb!
Re: Tri-Loc Registration !!!!!!!!!!!!!
I made a master alignment sheet for my light table.
It has
1- a horizontal line for top of image
2- a vertical center line that runs from top of image down to the bottom
3- left chest
4- right chest
5- registration mark top center
6- registration mark top left
7- registration mark bottom center
I saved the file as Master Alignment sheet.
I opened the same file and rename it to Template and save as a template.
Now..I removed everything except the registration marks
I do have guides setup to show top of image and center of image.
I add the color name close to the top ....out of the print area to show what screen is what color.
For instance...the word red would be red..so it will show up on the red positive.
Now I go back to my Master Alignment sheet and remove the bottom register mark. then print it.
Now I create my art ...save.....then select all then copy it
I paste my art on the Template keeping the top of image and center Left to right perfect.
Now I click on my bottom register mark and use the arrow key to move it up close to the art..........so I can place 2 items on the same screen.
Now I print my art work.
I bring my Positives to the light table...add the clear tape...then the double sided tape.
I align my top center register marks.
Then align the bottom register mark to the centerline.
The Top left register mark should automatically align.
Stick it down to light table then place the screen.
Burn screen.
Re: Tri-Loc Registration !!!!!!!!!!!!!
WOW, well, I'd be interested in giving it a try. I can see how Alan flipping his master jig upside down would elminate the issue I mentioned when inserting the screen frame. I did a couple 8 color jobs yesterday that on a couple screens from each job, there must have been some slipage of film, or carrier sheet in the exposure unit, the image ended up exposed 1/2 inch out of wack, not a huge deal, but a bit of a time sucker. Using the Richmond screen maker to expose, Alan knows this, the blanket sucks down to negative 20psi, lots of pull on the frame, and if anything is going to move, that super strong draw down, will make it move. I'm going to try this!!!, I see a couple new custom alignment grids and light tables in the works. Not to mention, I'll be able to burn two screens at one shot if I can get this working.
Thanks for the pics and elaboration guys!!
Mike
Re: Tri-Loc Registration !!!!!!!!!!!!!
I flipped it upside down and raised it up so that the exact same point of the frame would touch the stop blocks at the same place on the FPU and pallet jig. If those differ, your results could get very sketchy. For example, if corner 1 is on the stop blocks touching the top notch of the newman frame but the bottom notch of the roller frame is touching the pallet jig stop blocks then you will see registration issues. The FPU and pallet jig need to be identical in every way where they touch the frame.
Re: Tri-Loc Registration !!!!!!!!!!!!!
srimonogramming
I really like what you did with the Tri lock system so I am working on mine. I will post pics when finished and write a review about it. Thanks for sharing that I would have never thought of it myself.
Re: Tri-Loc Registration !!!!!!!!!!!!!
No problem Chris. Let me know if you run into any problems or have any questions.
Re: Tri-Loc Registration !!!!!!!!!!!!!
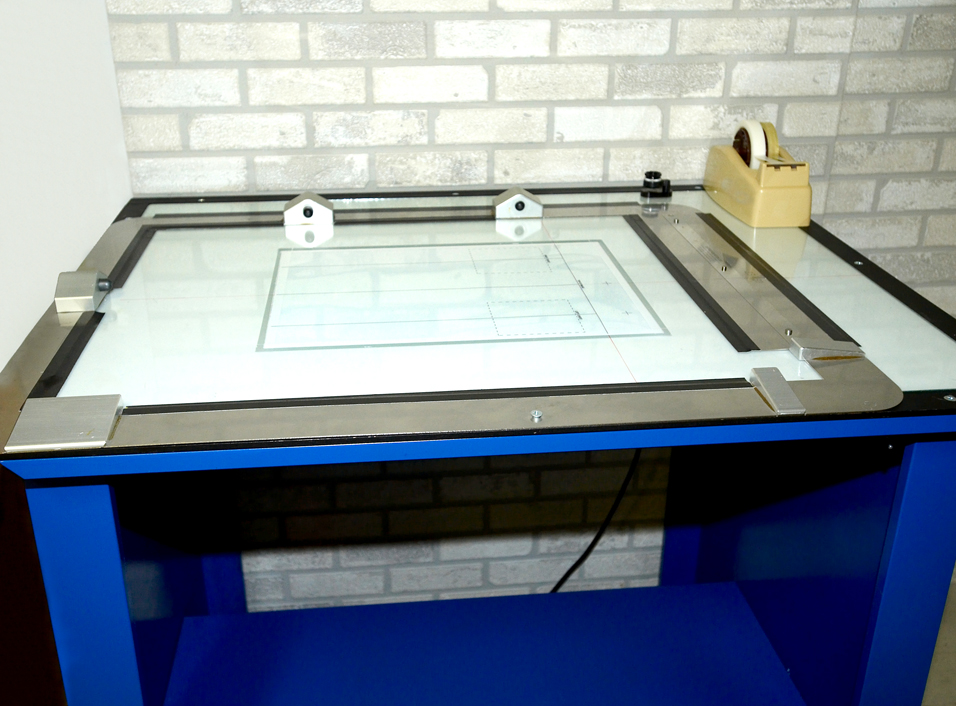
Ok so I have had this done for a while now and been putting it to use. Time to write my review. The whole idea behind this was to be able to use the M&R Tri-lock system to line up art work on my screens in the same place without using the pin system with carrier sheets and set them up on press with little to no registering. All of that being said I have a 06 Javelin! The M&R style pallet brackets will fit if you have the Quick release setup so I didn’t need to change that on the tri-lock pallet. Although I did need to make a few adjustment to it as you can see in the pics below. I cut about a 1-1/2 or so off the back side and had to get a little more technical on the front as you can see in the pics. After I was sure that part was going to work I started on the light table jig. I bought some aluminum square tubing from my local fab shop and made the outside frame and then used an old static frame for my art board. I did need to shorten the width by a few inches to make it fit correctly. I also used a flat sheet of 1/4in aluminum plate for the bottom. After making all of the necessary cuts using a jig saw, metabo, files and air dermal I had my brother tig weld everything. The jig itself is made of stainless steel so I used some gorilla glue that I bought at Lowes and glued it down which has worked fine so far. I used a peace of 1/4in yellow plexiglass that I ordered on Ebay for the top of my art board and put some led strip lights in it. Total cost for materials was around $250.
The light table jig works great!!! Love it... I can put a screen in it and tape down my art work in the same place every time no problem! The jig on the press works great also but here’s the problem! When I hit my air locks it will shift the screen some times more than a ¼ inch. Some heads are better than other. After locking the screen you can adjust it with the micros so that it makes the three points of contact needed. After doing a test print it will still need to be fine-tuned with the micros. This is due to a few things. 1. Not all my M3 rollers are perfectly square because I stretch them on a old wooden table. 2. The C channel were the frame is being held on press is not perfectly square which will make it shift when the air locks are engaged. 3. You can clearly see the head shift when it starts to pull on the print stroke. Believe me when say everything is tight. It just flex’s that much and no I’m not printing with too much presser. Solution, buy a M&R Lol. After the money and time spent I would say it was worth it just for the light table jig. I do use the jig on the press for jobs were registration is not so important.
Forgot to mention that I made a adjustable arm for the pallets, pic explains it don’t think I need to say much about it other than if you change pallets a lot this thing is great!!! Big time saver!
Suggestions, thoughts and criticisms are all welcome! Let me know what you all think!
Re: Tri-Loc Registration !!!!!!!!!!!!!
Chris i'm running a javie with tri-loc also...this flex that you speak of, i ran into the same problem with mine. what i did to fix this...i shimmed the rear clamps on one side so that way when they engaged it would put back pressure on the screen pushing it tight up against the tri-loc. it works great...very little deflection an almost perfect reg. on the first try. just a suggestion
hoogie
Re: Tri-Loc Registration !!!!!!!!!!!!!
[IMG]http://[/IMG]
Re: Tri-Loc Registration !!!!!!!!!!!!!
Re: Tri-Loc Registration !!!!!!!!!!!!!
Pics
Re: Tri-Loc Registration !!!!!!!!!!!!!
i created this in coreldraw x5..its the exact layout of my light table lines; pallet, screen & carrier sheets.....helps me see where my designs line up if i need to group images...i have the tri loc...the centerlines and marks are arranged to where i can group images...once eveything is in correct spot i delete the light table layout design and all that is showing is my actual design with reg marks and i sep and print.
Re: Tri-Loc Registration !!!!!!!!!!!!!
Would anyone mind sharing their Tri-loc template so I don't have to make one?
Re: Tri-Loc Registration !!!!!!!!!!!!!
Don't mean to resurrect this thread, but anyone know where I can print out a template I made for our shop?
Re: Tri-Loc Registration !!!!!!!!!!!!!
This is an interesting twist on the use of tri-loc. I'd like to point out that it is patented though, so I wouldn't brag about knocking it off or using it with other presses besides M&R when you do. M&R spends alot of money making their equipment do what it does and it does it well. I'm not very sure what patent covers for your own use.
As for a template, just call M&R and buy the plastic sheet that has the lineup grid on it.
My personal experience, in a past shop is that we made an alignment jig for our own use with a very old TUF Olympian and TAS R series. It was better than getting bit by a dog, but some days that was debateable. We made a alignment grid with a sharpie and straight edge and an old x-ray viewing box for a wall mounted light table. It was a simliar 3 point line up. We used a piece of 1/4 plexi for the on-press piece. It was designed to interface a pallet to a screen and replicate the 3 points. As we had two presses, we had two alignment jigs. The pallets on our press were not removable.
One thing to watch out for is making sure your screens are all the way down in the exposure unit piece. If they vacuum down and hit the glass it will eventually shatter.
We ran about 20-30 screens a day with two autos and mostly 1 to 2 color 1 to 2 location jobs in the 35 to 250 piece range.
My thoughts on this system:
- It's an interesting way to change how you use the carrier sheets, which are a nuisance level expense.
- It will eliminate pinholes from the inevitable gunk that winds up on the carrier sheets before you toss them or they become unusable because the holes enlarge.
- The primary purpose of the on-exposure piece is to register your screen to the carrier/artwork combo. With it on the wall you could do this pretty easily with gravity. So I'm not sure what value it adds... the spring clamps in it are something of a PITA.
- It's interesting that the Workhorse presses can use the same parts. When I looked at their presses earlier at a show I thought it looked like a copy of M&R.